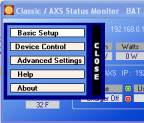
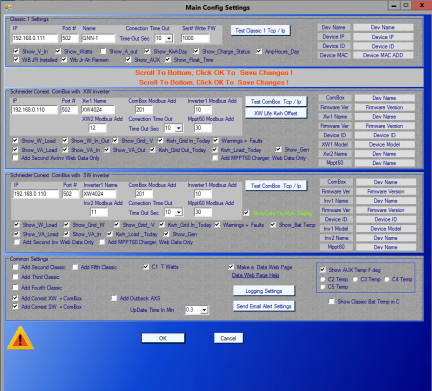
Settings For First
Classic
Note: Add classic 2,3,4 checkboxes have been moved to
the bottom of the Settings Page.
Step One
- Click on Menu
- Select Basic Settings
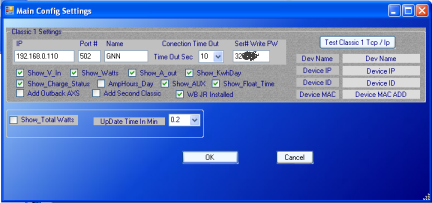
- Enter: Ip or url for Classic And Port of
Classic,
It is Best to use Ip addresses If possible.
- Click Test Classic (x) Tcp / Ip The Program will Look for a
classic at the Address and Port. (If you skip this step ASX Will not be
Available)
If
a Classic Answers, the 4 Device Box's below the test button
will be filled in.
If NO Classic is found
There maybe A long delay,
If The Classic is not
found.
- You will also see a
error at the bottom of settings window, with some explanation.
- At this point you will
need to Check,
network Settings or Make sure no other program is Connected to the
Classic, check firewall, etc. .
If
The Classic Is Detected continue to Step Two
Step Two
- "Name" will be filled in
with name that is programmed in Classic after pressing Test Classic (x)
Tcp / Ip, This Can be changed if you wish this only effects the name
displayed on the main page. It dose
not change the Classics's Name.
- "Time-out" normally Is ok at 10 sec.
If you have a slow connection and get connection errors it may need to
be lengthened .
- "Write PW" = Password
for writing values To the Classic it is used in the "Advanced Settings" and " Device Control" Sections of the program.
Enter the
Serial Number of Classic without leading zero's. This may be
left blank
if you do not plan on changing any settings on the Classic.
- "Check Boxes" Select the
check boxes of the items you wish to be Displayed on the Main Window.
- Do NOT Check "Add Outback AXS" Or "Add Second Classic" at this
Time.
- "Show_Total Watts" is only
Checked if Monitoring more than one Classic
it add a Total Watts field to the Main Window, witch will contain
the Combined wattage of all Classic's being monitored.
- "UpDate Time In minuets = Time in minuets
between refreshing Data from Devices.
( .2 min (12 sec)) To
30 min Max), Recommend .3 To 5 min.
If using Auto Controls Functions to Control Outback AXS set to no more
than 2 min.
- Click
OK, make sure all
displays
on main window are working as wanted,
Then come back to "Basic
Settings" to make Changes
Or Add more Devices One at A Time.
|
|
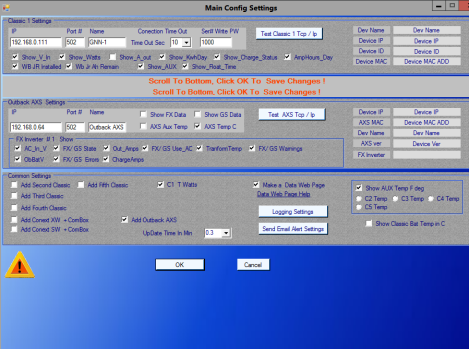
Settings
for Outback
AXS With FX Or GS Inverter
( If you Have One and want it Shown )
Step
One
Note
: You Can Not Access The
Outback AXS Or Conext XW Inverter Until you Have
Successfully Connected To a Classic
Charge Controller At Least Once with This Program.
- Click on Menu
- Select Basic Settings
- Select "Add
Outback AXS" Check box at the bottom of Settings Page.
A new form for Outback AXS settings will
appear.
- Enter: Ip or url for Outback AXS And Port of
Outback AXS ,
It is Best to use Ip addresses If possible.
- Click Test AXS Tcp / Ip The Program
will Look for a AXS at the Address and Port.
If NO
AXS is found There
maybe A long delay.
If
a AXS Answers, the 5 Device Box's below the test
button will be filled in.
The bottom box will show
FX Or GS Inverter if Detected.
If The AXS is not
found.
- You will also see a
error at the bottom of settings window, with some
explain.
- At this point you will
need to Check, network Settings or Make sure no
other program is Connected to the AXS, check firewall, etc. .
- Note: The AXS Can be
Slow to respond, and on occasion been known to lockup if it loses
network connection, Some times requiring reboot (unplug cable between
AXS and Inverter
for a few seconds and reconnect. (my experience Any way)
If The Outback
AXS Is Detected continue to Step Two
Step Two
- "Name" will be filled in
with name that is programed in The AXS after pressing Test AXS (x)
Tcp / Ip, This Can be changed if you wish this only effects the name
displayed on the main page. It dose
not change the AXS's Name.
- Select the proper check box FX Or GS Inverter
- Feild "Check Boxes"
Select the check boxes of the items you wish to be Displayed on the
Main Window, Ac_in V, State, Warnings, Errors, ect.
- Click OK, make sure all displays
on main window are working as wanted,
Then come back to "Basic
Settings" to make Changes Or
Add more Devices One at A Time.
|
|
Conext ComBox With XW and or SW Inverter
( If you Have One and want it Shown )
XW and a SW Inverter Can not be connected on the same ComBox.
Step One
Note
: You Can Not Access The
Conext ComBox Until you Have
Successfully Connected To a Classic
Charge Controller At Least Once with This Program.
- Click on Menu
- Select Basic Settings
- Select "Add
XW + ComBox" Check box at the bottom of Settings Page.
Select "Add
SW + ComBox" Check box at the bottom of Settings Page.
AND OR
A new form for ComBox settings will
appear.
- Enter: Ip or url for ComBox And Port of
ComBox ,
It is Best to use Ip addresses If possible.
- Enter: Modbus Port Address for ComBox And Modbus Port of
Inverter ,
- Click Test ComBox The Program
will Look for a ComBox at the Address and Port.
If NO
ComBox is found There
maybe A long delay.
If
a ComBox Answers, the Box's to the Right of test
button will be filled in.
If The ComBox is not
found.
- You will also see a
error at the bottom of settings window, with some
explain.
- At this point you will
need to Check, network Settings and ComBox Settings, Modbus Addresses, check firewall, etc. .
If The
ComBox Is Detected Continue to Step Two
Step Two
- "Name" will be filled in
with name that is programed in The ComBox after pressing Test ComBox (x)
Tcp / Ip, This Can be changed if you wish this only effects the name
displayed on the main page. It dose
not change the ComBox's Name.
- Field "Check Boxes"
Select the check boxes of the items you wish to be Displayed on the
Main Window, Ac_in V, State, Warnings, Errors, ect.
- Click OK, make sure all displays
on main window are working as wanted,
Then come back to "Basic
Settings" to make Changes Or
Add more Devices One at A Time.
|
|
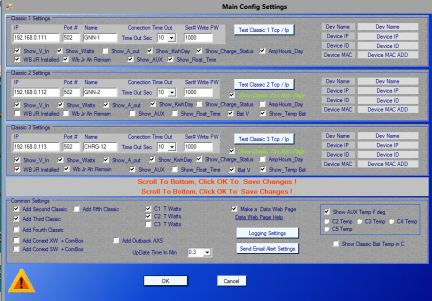
Settings for Second Classic &
Third Classic & Fourth Classic
- For Second Classic , Select " Add Second Classic " Check box at the bottom of Settings Page
A
new form for Second Classic settings will
appear.
- Follow
steps as as shown in Classic 1 Settings.
_________________________________________________________________________
- For Third & Forth Classic Same as above.
|
|